Camera Obscura: The Pinhole Camera

|
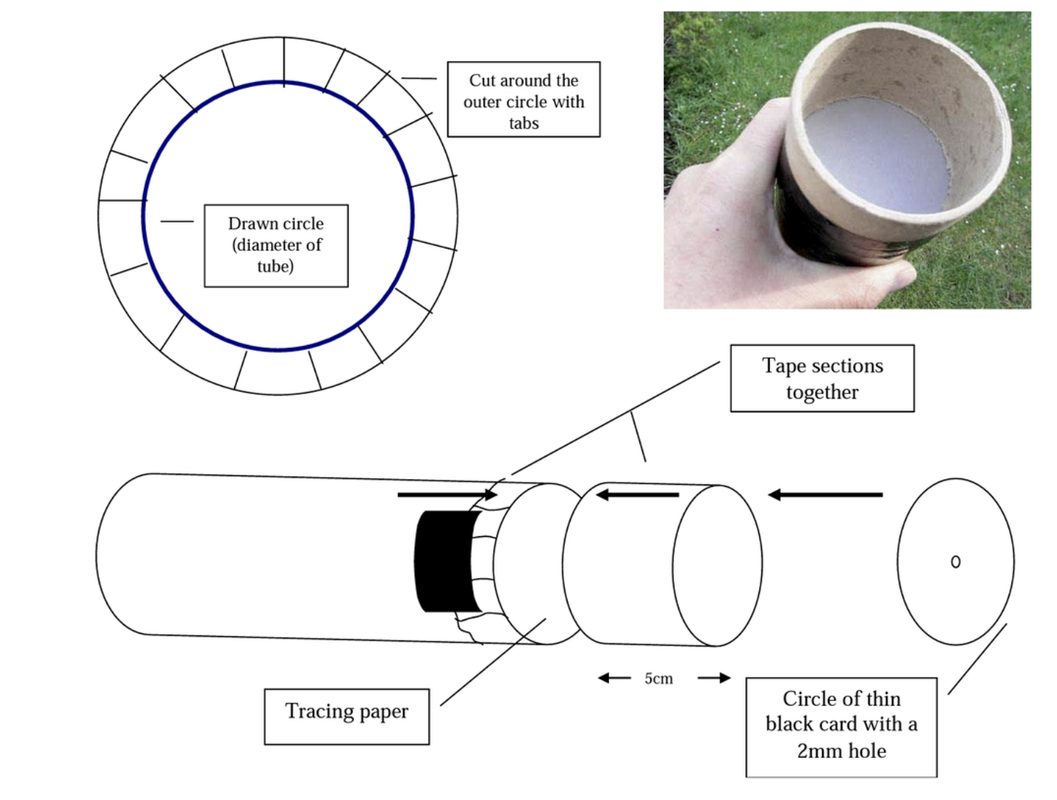
The word Photography is derived from the Greek roots (photos) meaning "light" and (graphos) meaning "drawing" or "writing". This suggests that photography is like drawing with light which it basically is. The phrase 'camera obscura' however has its roots in Latin meaning 'Dark Chamber'. This is also very accurate since a dark chamber is needed in a Camera Obscura camera so that the light can be projected through the pinhole and onto a surface for a brief moment so it won't be overexposed with the end image being upside down.
The invention of the camera obscura is attributed to an Arab physicist named Ibn al-Haytham, who's optic books in the 11th century featured light tests using this mechanism. During the Renaissance artists such as Leonardo da Vinci used camera obscura as a tool to create art in a perfect perspective. It helped them to make their drawings and paintings more accurate especially for the outdoors as they could trace lines and shapes from a projected image onto their canvas. When artists used camera obscura with a lens they realised that it was not only sharper and brighter but also inverted the image and caused it to be projected upside-down. This is because with a lense the camera obscura worked much the same way as the human eye with the final image having to be flipped or reversed. Equipment I used : pringles jar(container), masking tape, gaffer tape, bottle can cut-out, pin, dark spray paint, dark paint, tracing paper To make my own camera obscura I needed to:
|
|
|
|
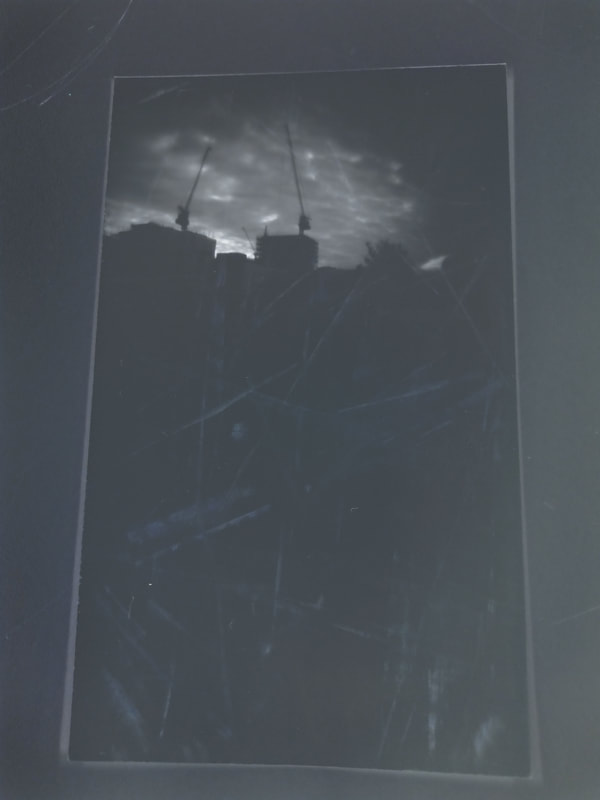
My work using a pinhole camera
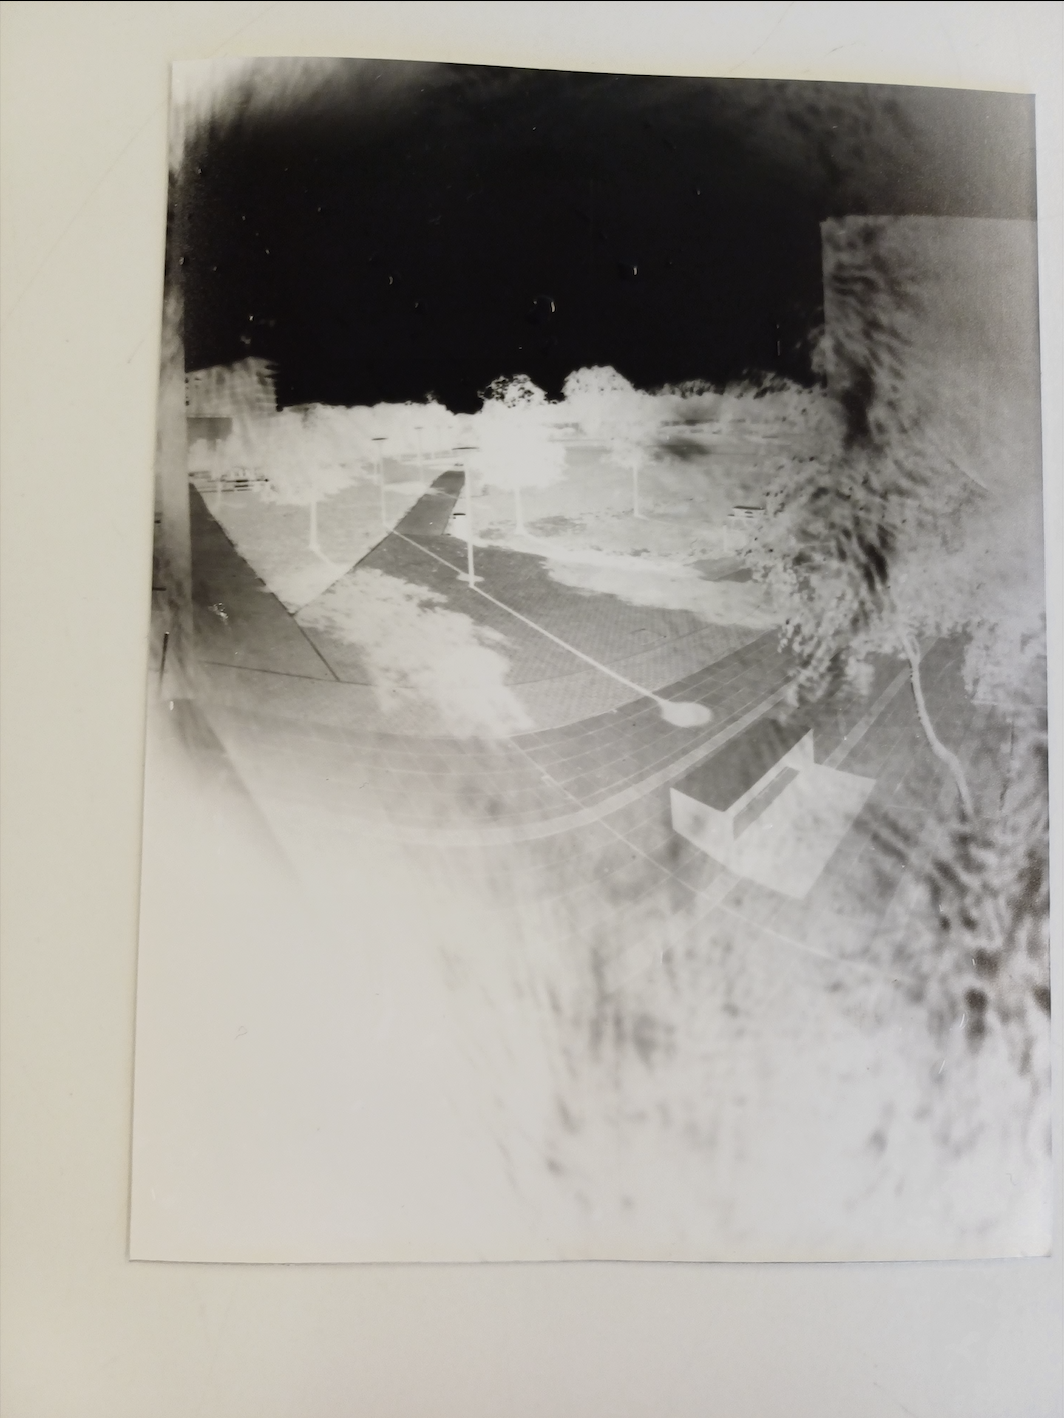
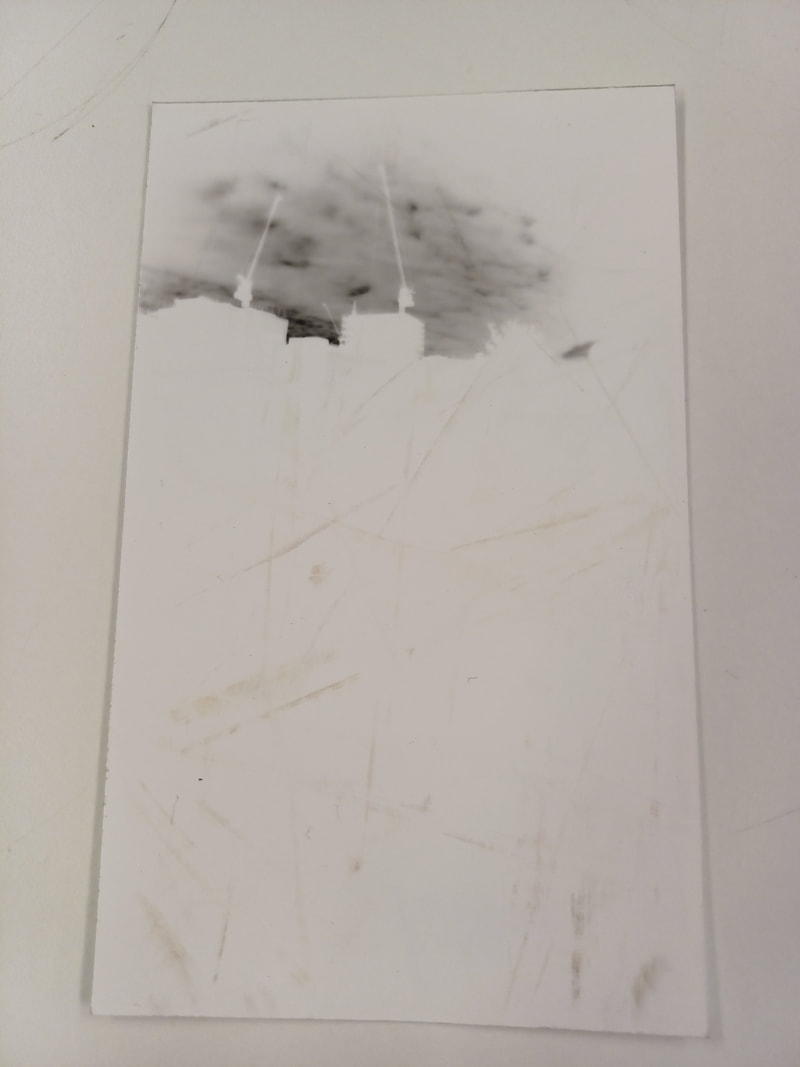
To get the camera obscura photo back to closely resemble a proper, more natural image, I put the images into photoshop and inverted them. The images on the left are the original, from my camera obscura, while the images on the right are the products after inverting them in photoshop. They appear much darker than in proper photos which give them a more stylastic feel.
|

|
Abelardo Morrell


Abelardo Morell is a contemporary artist widely known for his work with camera obscura, especially concerning large rooms, as shown above. He began this Camera Obscura series in 1991, transforming entire rooms into cameras by covering the windows and inserting a small hole, in which he was able to photograph the outside world as projected onto various interiors. Morell was awarded the Cintas Foundation fellowship in 1992 and the John Simon Guggenheim Memorial Foundation Fellowship in 1993.
|
"It's important to me to have what I photograph undergo a certain transformation - to become a thing different from what we are used to, to be another version of itself." -Abelardo Morell |
|
|
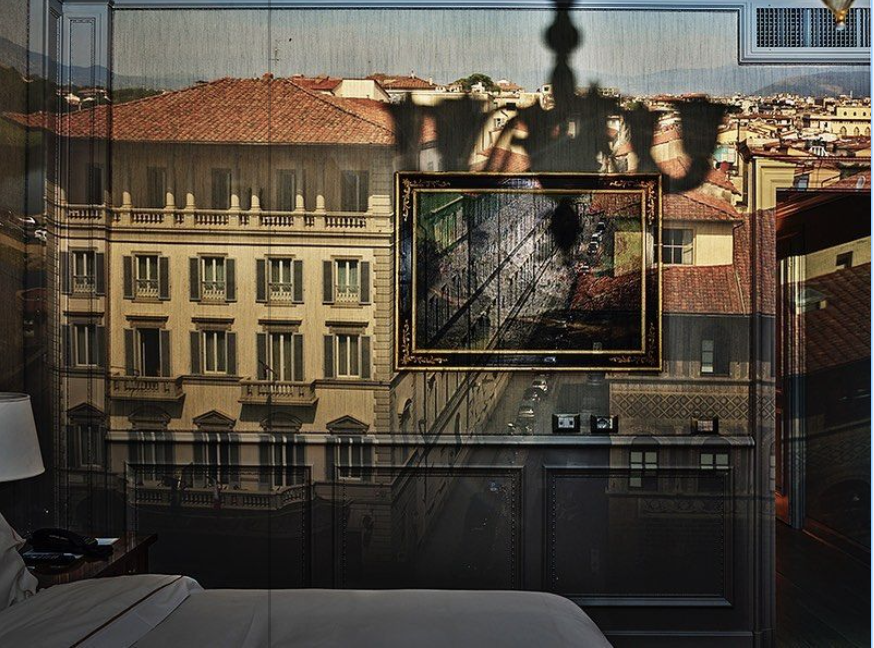
I like many of Morell's photographs as they seem very creative and manipulate the camera obscura in ways you would not usually think of. The photograph on the right called "Florence from Hotel Excelsior" Is one of my favourites since it not only shows how the projection effects the room but also show how the environment itself also changes the image projected like with the painting changing the colour of the image and the shadow of the light both demonstrating how the two different aspects of the photo contribute to give it a unique feel. |
Justin Quinell


Pinhole Photography Evaluation
This topic was very interesting and engaging for me, discovering the technique of using the camera obscura in order to produce and inverted image, just as many photographers had done before me, thousands of years ago. In this course we primarily focused on the practical side of the topic, creating our own pinhole cameras and experimenting with them. In this topic we also used the dark room and practised exposing our images using the chemicals and leaving them to dry.
Vjeko Sager - Antimatter


|
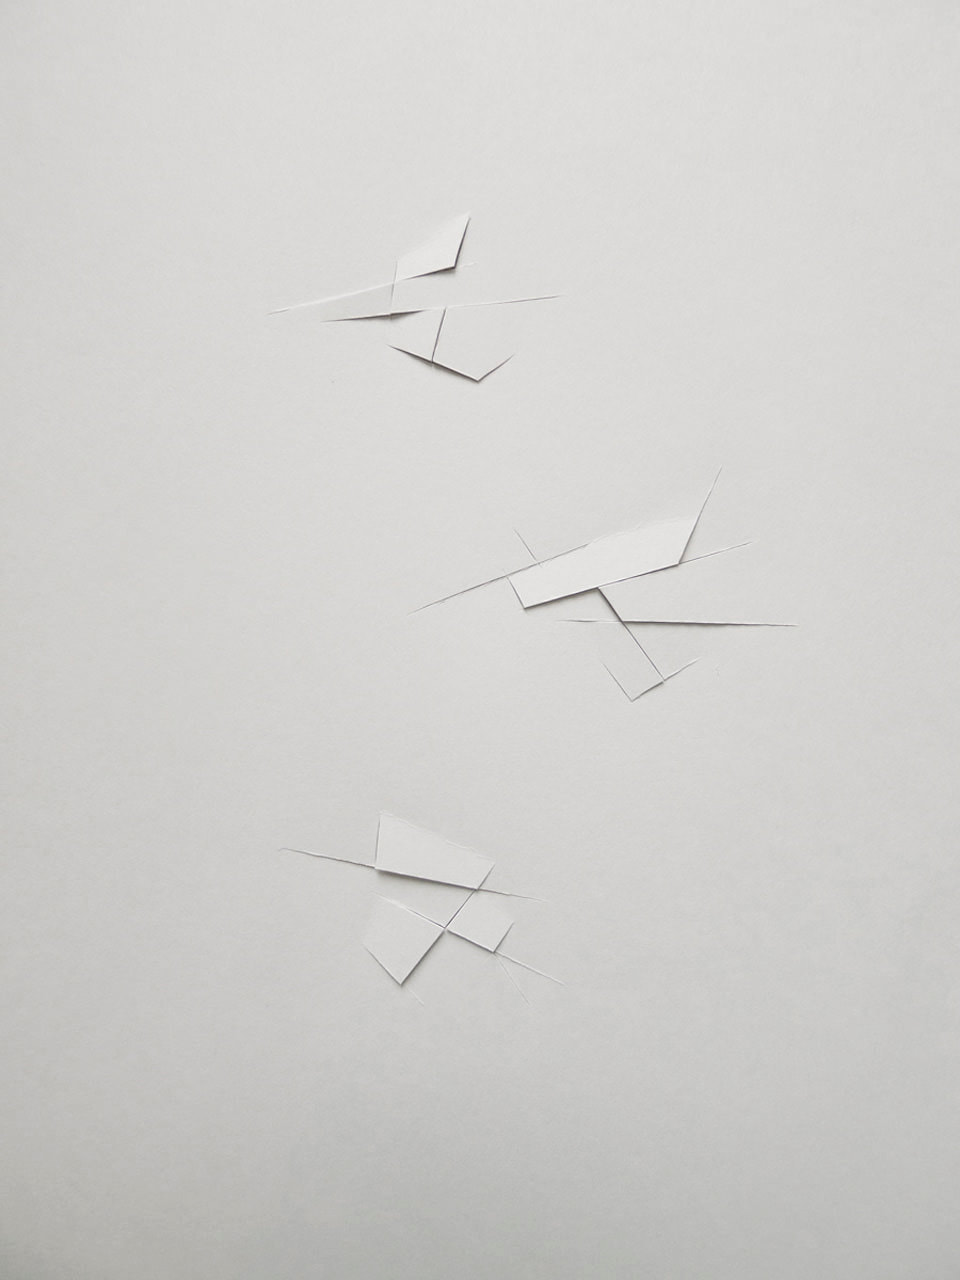
My first impressions of his work lead to them being quite minimalistic and simple but with quite a complex meaning hidden under the cuts and folds.
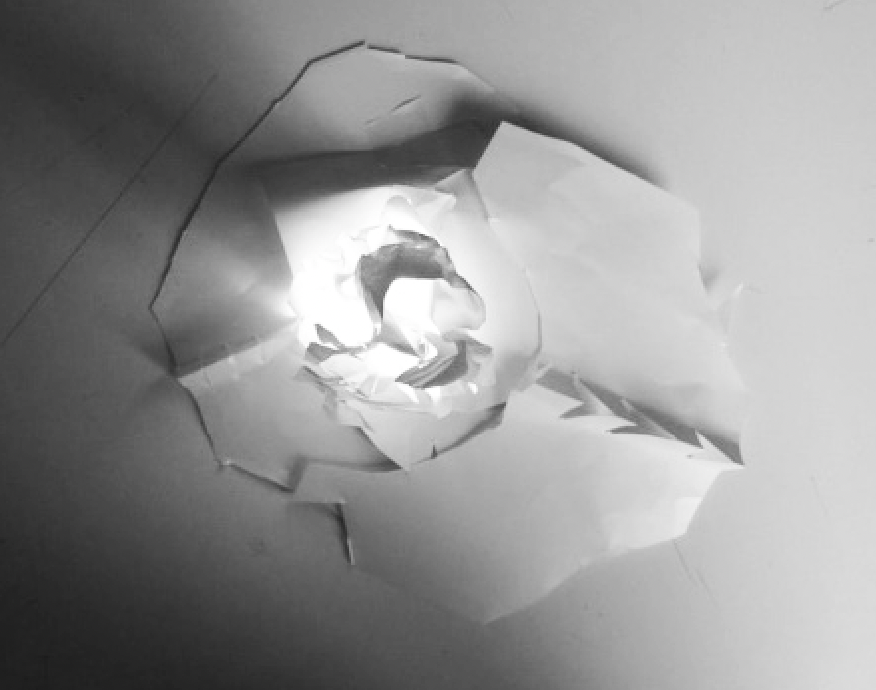
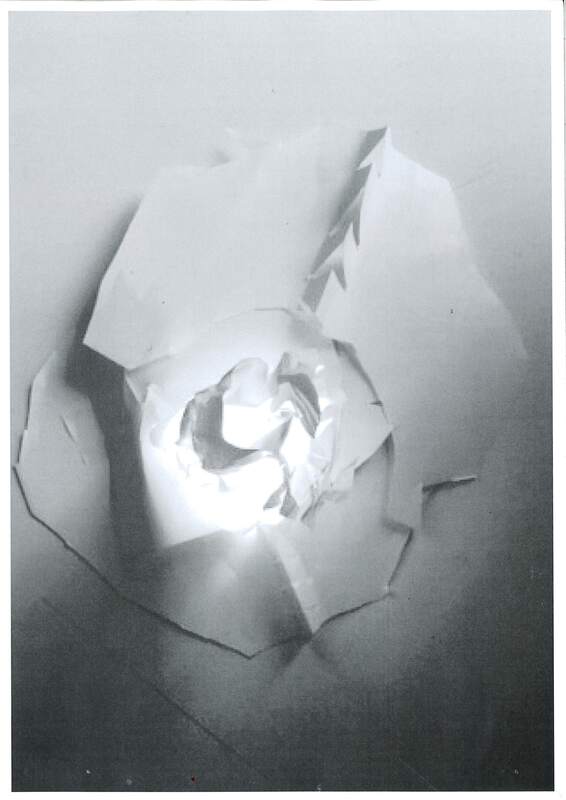
I find this type of art quite dull and uninteresting but I can see how precise and sharp his cuts are which makes them very satisfying and pleasing. Vjeko Sager is a professional artist, philosopher, educator, curator and obviously, photographer who has been awarded, exhibited and represented in both private and public collections across multiple countries, showing his influence and popularity. This piece of work he has named Antimatter, taking inspiration from The Order of Things (1970) by Michel Foucault, in which he referred to spaces of knowledge as defined by various 'foldings' which relates to his work. He says he 'performed the unthinkable, by cutting the surface and producing the rupture in knowledge.' and if matter is memory therefore he has created amnesia or antimatter. In this photograph he has used a normal angle of view, directly elevated above the A4 paper in portrait orientation. He has framed the image around the piece of paper in order to present the contrast between the paper (matter) and the cuts (antimatter), creating quite a formal style. Due to the publicity of the artist it is safe to assume this photograph is authentic and consistent with its positioning and realism. However, the effect of the image may not connect to certain audiences due to its simplicity and dullness, with many youngers failing to see the point of his work. Overall, this photograph can show how even in dull scenarios, complexity can be achieved with something even as simple as a piece of paper being a canvas for infinite possibilities of matter... and antimatter! |
My work


After cutting and folding sections of my A4 paper, I twisted them into shape and took my photos, but since I only managed to take 5 and many of them were quite similar I took some more photos, trying to be more creative with my shots and compositions. In this experiment I was mainly just playing with folds, angles and the shadows that could be created from them.
I consider myself as an amateur photographer and so some of the images may appear more blurry and present strange framing choices. I haven't given these photographs names yet but I could imagine them being called something like shurikens or some sharp object; rotating round from the centre. As I took these photos I realised just how much movement one could assimilate just by using different angles or pointing the cuts in opposite directions.
Many of these photographs are just taken from an elevated normal view. I felt it okay including the table through the cut-outs as it helped to improve on the theme of movement as the position is different in each photo. I generally tried to frame the images within the paper but it was quite difficult to do with certain angles and so I just allowed this to give more variety and to test the effect it had on the images.
These images aren't entirely authentic as they are not consistently shot well with the same form and composition but there is no form of cheating or not factual elements associated with the creation of these photographs as many of my peers can confirm as witnesses. Concerning the effect on other people I think my images are very limited, but they do serve as an example of how to make something out of nothing; first starting off as uncoordinated cuts and folds soon could be manipulated into something more meaningful with the right composition and angles.
In conclusion, while my images do follow those of Vjeko Sager concerning antimatter, I do think my images have a unique feel to them that sets them apart from his; being less precise and detailed but not confined to the boundaries that he put in place, with much more fluidity as my work isn't restricted with a theme or distinct purpose; instead being a work that's meaning has to be discovered by the audience and so is up to debate.
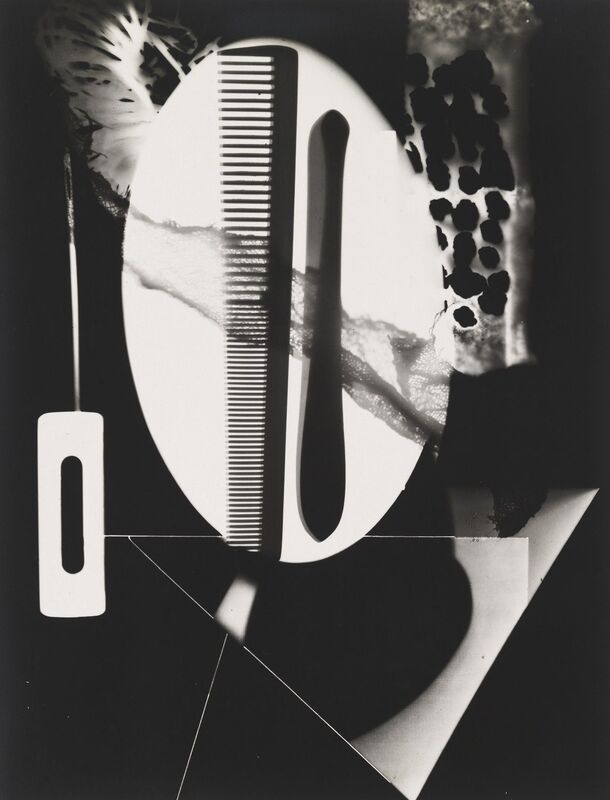
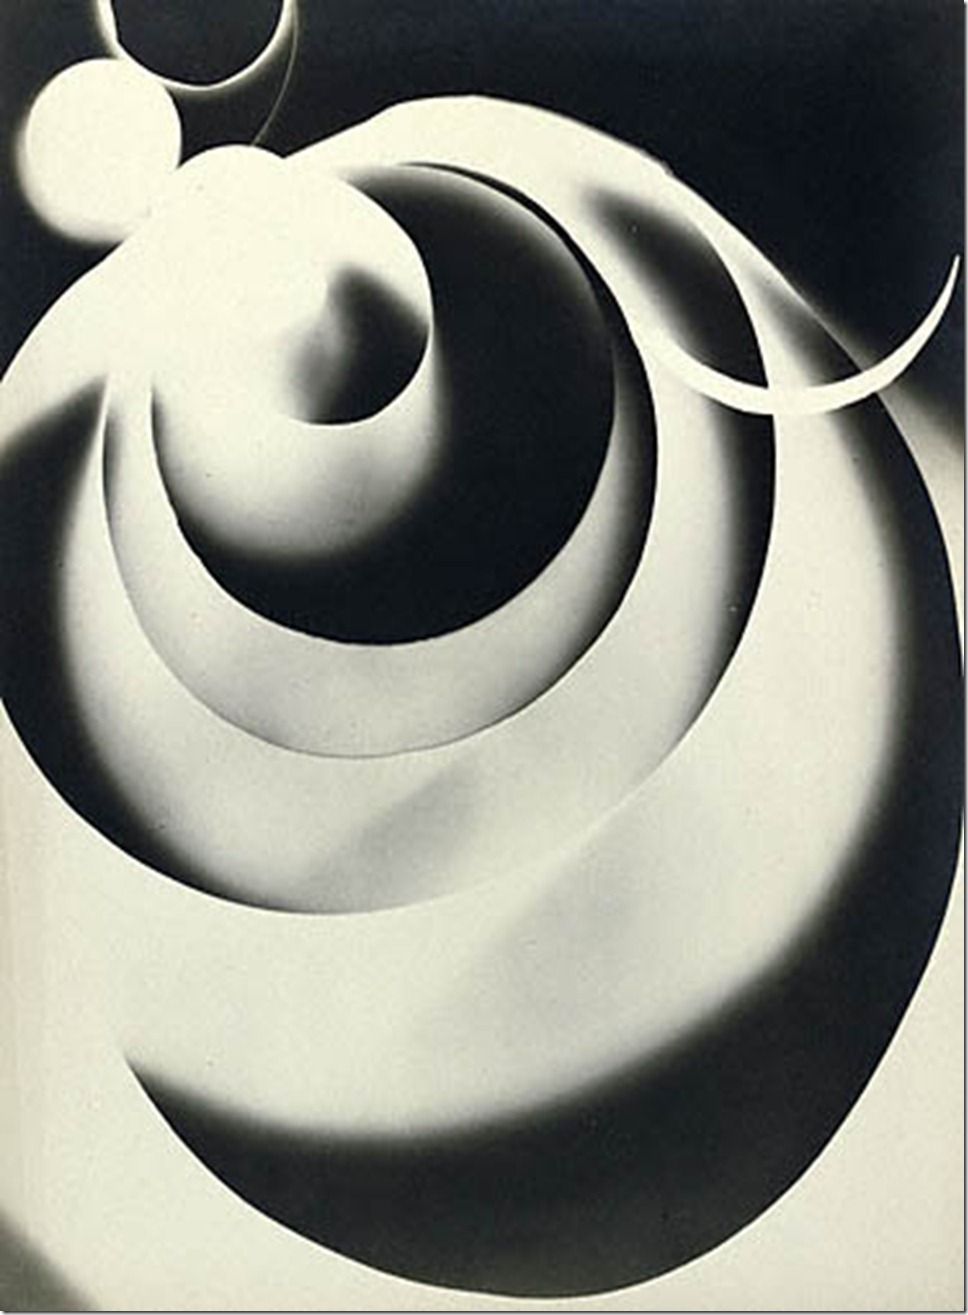
Francis Bruguiere


In conclusion, his work such as this piece here are all great experiments and constructions of light, serving as perfect depictions of the great extents that photography goes to, with the word itself describing the manipulation and use of light, which these images encapsulate very effectively.
|
Brugiuere was an American photographer who moved to London in 1928, where he began to experiment with non representational and abstract photography. His cut paper abstractions are especially well known. The photographer explores the endless subtle qualities of paper and light, manipulating contrast to create complex patterns of texture and form.
I was especially drawn to this piece due to the stark contrast of light and dark, with grey areas present as a result of these two factors clashing. The positioning of the cuts and shadows work together to trick the brain, making it difficult to distinguish if light is from dark or dark is from light. Another aspect of this work is the level of movement this still image can convey through the curves and folds. The colour pallet is restricted to black and white tones to present strong contrast. Bruguiere has possibly chosen to take this image from an elevated view but regardless he has composed the photo so that we feel close to the cuts and folds almost as if being in a dark room with rays of light spilling through curved windows and crescents. Francis Bruguiere is considered a professional and renowned photographer, praised for his abstract work and thus these images are authentic and original. They also seem very effective in displaying the impact of light and how it can be manipulated, engaging the audience to think about the endless possibilities that can be created from cuts and folds. |
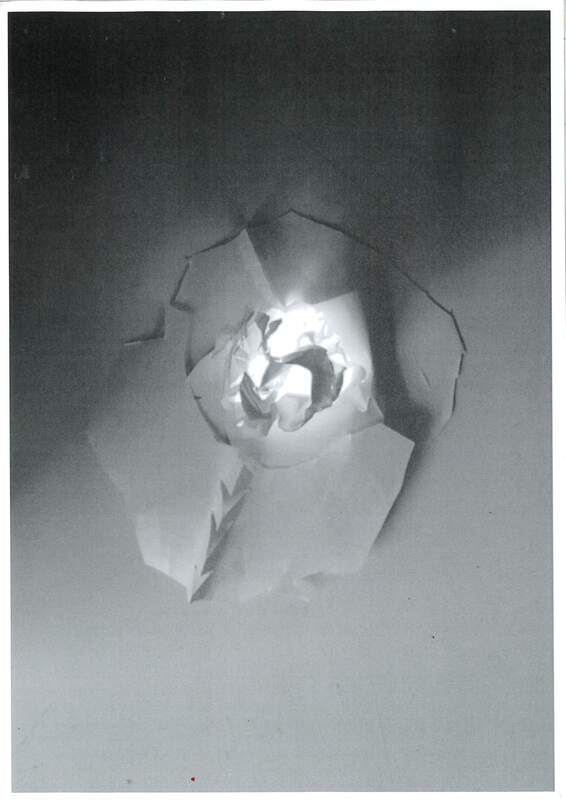
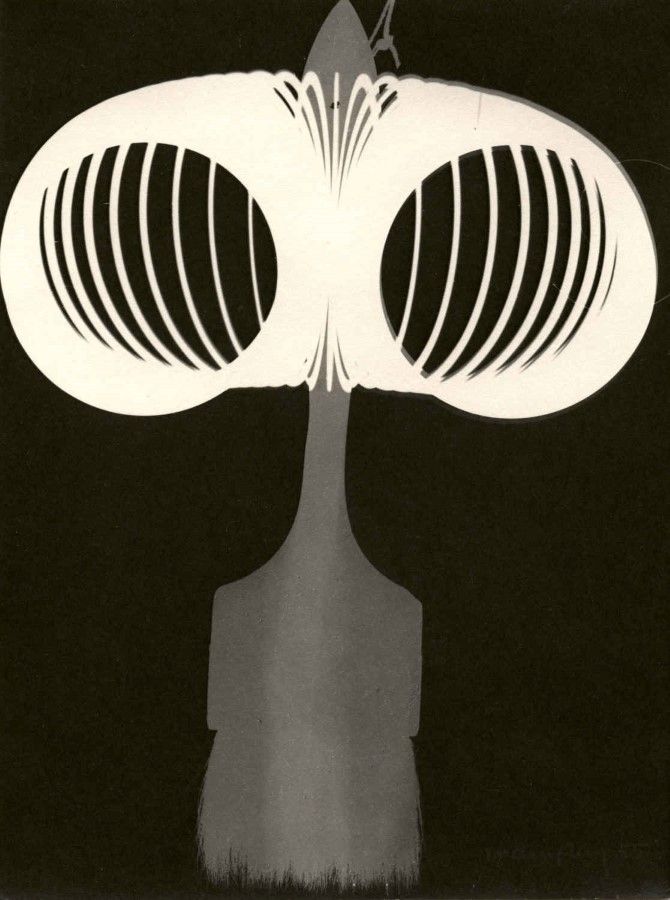
My Work


I decided to use my phone's torch as the source of light, basing and sculpting the paper around this pillar of brightness. I hid my phone under pieces of paper and put many layers upon it to make it seem more natural and give the idea that there is no phone, making the images more abstract and mysterious.
I, as said before, am not a professional photographer and thus multiple mistakes can be found in my work. For example, composition wise, the framing for some of these images is not consistent, with other objects being seen in the background and the subject sometimes being cut out of frame.
I, as said before, am not a professional photographer and thus multiple mistakes can be found in my work. For example, composition wise, the framing for some of these images is not consistent, with other objects being seen in the background and the subject sometimes being cut out of frame.
|
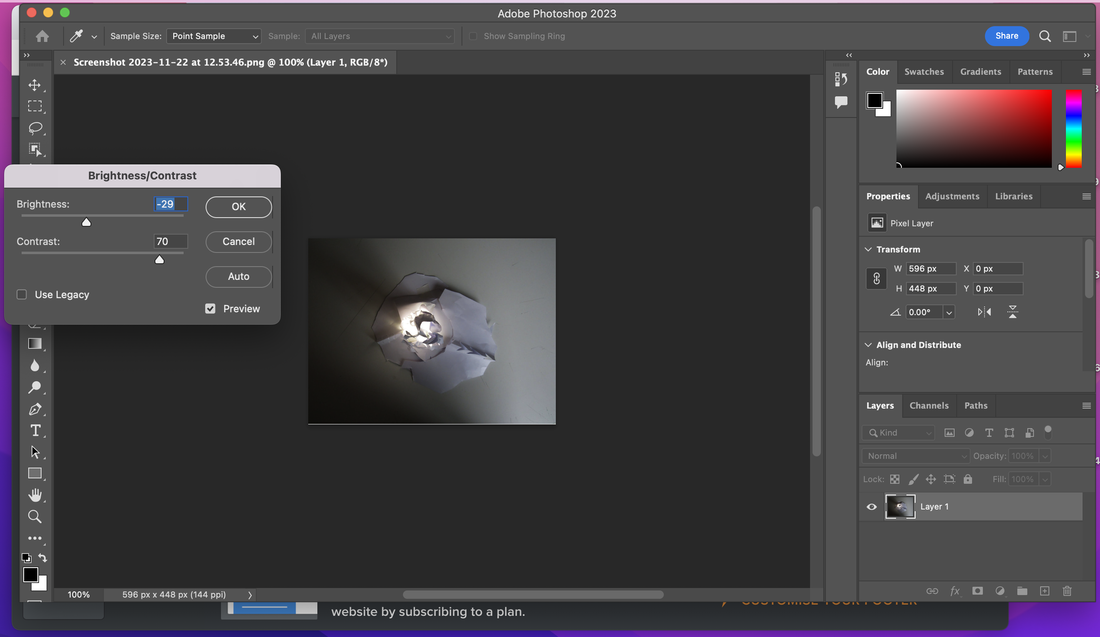
After taking all of my photos, I selected one of them and experimented on it in photoshop, manipulating the brightness and the level of contrast between the dark and light areas of the image, as well as increasing the overall sharpness and refining the photo in general. The left image displays the original, while the right image is the final product after increasing the light and contrast, making it appear much more dramatic and stylistic.
|

|
|
Colour Copying
|
|
Chasing Light Assignment - 35 Images


Overall I think I had a lot of fun completing this task, as it gave me something to do and look for while outside of school that was related to photography. I took these various images around my local neighbourhood, while I was away on holiday in York, at petrol stations, in trains, at church and this abundance of light and unique moments helped me to fully appreciate the beauty of everyday life and the fact that you can find light everywhere as long as you look hard enough.

|


|
My sculptures


While I was generally alright with how many of these photographs came out, my inexperience with using the lights and the stand resulted in some of the images looking reasonably uneven, especially the first set of photos with my original sculpture, as one can definitely see the difference between the light and dark areas.
I took most of my photos from the frontside of the sculptures, but occasionally set up from elevated positions and side angles. I tried not to display much of the stand in my photos and not subvert the viewers eyes from the sculpture to the background through a high level of contrast.
I think that the group of images of my second sculpture are superior to that of my first because they appear more visually clean due to low contrast in levels of light. Concerning the sculptures by themselves however, I found my original sculpture the more creative and interesting of the two, with a variety of different shapes and colours. My second sculpture in comparison just seemed very simple and a bit to natural for an abstract construction.
In conclusion, looking back on both of my sculptures they seem to appear almost to naturalistic when I should of instead focused more on the layering aspect of the sculptures, embracing the abstract identity that they may acquire if let loose. I am glad I have this knowledge for the future making upcoming sculptures so that I can be better prepared for creating more visually intriguing
work.
Light Painting
Video Review
|
|
This video is very helpful in describing the process of light painting. It definitely hooks me in, displaying how cool and creative you can be using this technique. He seems to be experienced in this technique and explains it very well. He annotates the images with the Aperture and Shutter Speed of the cameras used, which is extremely helpful for some people trying to pick up photography. He gives a good explanation of the simple ways in which you can create these images, such as via the use of the light orb effect.
|
My work with light painting


My work with light painting was purely experimental, working with my peers we were able to practise with the technique and create a variety of images using different colours and different patterns. Our supervisor explained the technique of setting the camera to a long exposure time, while manipulating different forms of light in the dark to produce unique images.
Because this was the first time for me and my peers utilising this technique in Photography, our work may not be flawless and much can be done to improve these images in terms of their creative potential. I will admit that I forgot about the process of exposure for the camera and so the silhouette of me can be vaguely seen in my second image.
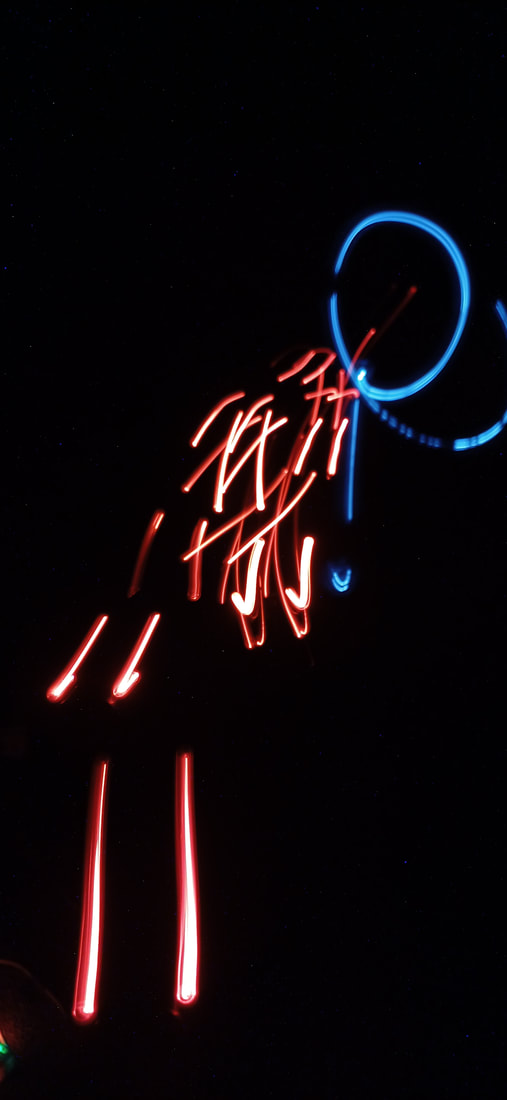
We kept to forward facing, flat, static shots to keep it simple with the camera staying in one perspective. At first we tried just creating shapes with a light stick - my input was the cross-like shape, which I managed to quite convincingly make it look as if a person was on the cross, and so can bare some possible religious connotations. My peers then experimented with writing out their own signatures and drawing more straight-forward shapes such as stars and triangles.
After this we then used the light block, which could change colour, to create patterns and backgrounds against the silhouette of a fellow student. The image that I choreographed of this group is the 4th row down on the right, in which you can see I created a swirling spiral, some could say a vortex, around another student. I was once again quite pleased with how the image turned out, since it managed to look natural to a certain extent. Other students then also tried incorporating swirls and circles in their photographs as well.
Overall I think that I was quite pleased with this session of light painting, as it let us produce images I didn't know were achievable. I am glad that I stepped in to operate the camera for most of the images, as it will help me in the future to set up and take pictures of an intended target with higher confidence.
Because this was the first time for me and my peers utilising this technique in Photography, our work may not be flawless and much can be done to improve these images in terms of their creative potential. I will admit that I forgot about the process of exposure for the camera and so the silhouette of me can be vaguely seen in my second image.
We kept to forward facing, flat, static shots to keep it simple with the camera staying in one perspective. At first we tried just creating shapes with a light stick - my input was the cross-like shape, which I managed to quite convincingly make it look as if a person was on the cross, and so can bare some possible religious connotations. My peers then experimented with writing out their own signatures and drawing more straight-forward shapes such as stars and triangles.
After this we then used the light block, which could change colour, to create patterns and backgrounds against the silhouette of a fellow student. The image that I choreographed of this group is the 4th row down on the right, in which you can see I created a swirling spiral, some could say a vortex, around another student. I was once again quite pleased with how the image turned out, since it managed to look natural to a certain extent. Other students then also tried incorporating swirls and circles in their photographs as well.
Overall I think that I was quite pleased with this session of light painting, as it let us produce images I didn't know were achievable. I am glad that I stepped in to operate the camera for most of the images, as it will help me in the future to set up and take pictures of an intended target with higher confidence.
Photograms
- Man Ray
|
|
|
A photogram is defined as a photographic image that is made without a camera, by placing objects directly onto a light-sensitive paper. These images are traditionally black and white or greyscale, meaning there are often have high levels of contrast.
One example of a well-known photogram photographer is Man Ray, who's work I have displayed above, a member of the Dada movement, shaped by the traumas of the First World War and began experimenting with photograms around the early 1920s. He supposedly constructed these images using various objects and materials, sometimes parts of his own body, displaying his dedication and commitment to this artform.
"I have finally freed myself from the sticky medium of paint, and am working directly with light itself."
-Man Ray
Equipment I used : light-sensitive paper, photo inputs on see-through paper, a pen, various chemicals, harsh source of light, chemicals (in trays), water, tweezers
To make my own photogram strips I needed to:
- First, print off see-through imprints or acquire small see-through objects
- Get into an area such as that of a dark room, in which no light will be able to indirectly affect the making of the photogram
- Place the light-sensitive paper under the see-through imprints, both under a harsh light source, turn it on for 2-3 seconds and then turn off
- Take the light-sensitive paper (strips) and place them through they chemical trays to , leaving them in each chemical for a couple of minutes before placing them into the next tray
- Finally place the paper into water and then take them out to let them dry. By now a black and white image should have materialised onto the paper strips
My Work with Photograms


(Not completed yet)
Light as subject
Jacques Pugin


Jacques Pugin is a Swiss/French photographer that was one of the precursors to the light painting style of photography, focusing on capturing light and luminous subjects. Recently, he has focused especially on nature in his work. His style of photographing includes particular focuses on traces or signs of humanity, marked by pathways and trails in the landscape, reminiscent of human elements. His work helps to display the complex connection between man and nature, along with the reflection of time and space. He likes using monochrome colouring to highlight the darkness and present a greater contrast with the lines of light.
Overall this monochrome, simple and striking image succeeds in having a short but effective impact on me and the audience.
|
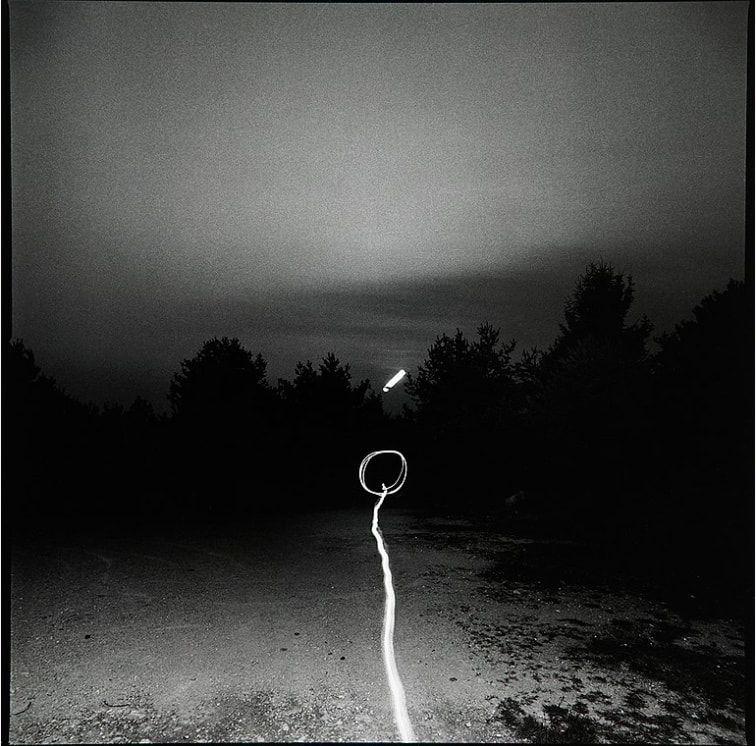
Of the six photos I chose this one in particular due to how it stood out to me as somewhat minimalistic and yet it drew me in with its high contrast and surprising sense of movement and direction.
This photo is part of his 'Grafted Griffiti' series and was taken by Jacques Pugin, a professional photographer, famous for his work in light painting. This photo is level to the horizon and depicted in a landscape form, with a normal angle of view. The picture is in a monochrome tone, so that the streak of light is juxtaposed by the dark silhouettte of the trees and background. Furthermore, the frame is composed around the line and ring of light in the centre of the image, emphasising the forward moving flow of direction and the story the image may tell of a journey and path, with the ring of light as the end of the road. This is further compounded by the static shot and the blurr of the light in the middle, opposing the sharpness of the background, once again giving the impression of movement. This is likely a completely authentic photo, as it was created by a professional and experienced photographer taken in his home country, who has worked with this technique many times before in their career. |
Photoshoot - Independent Experimentation
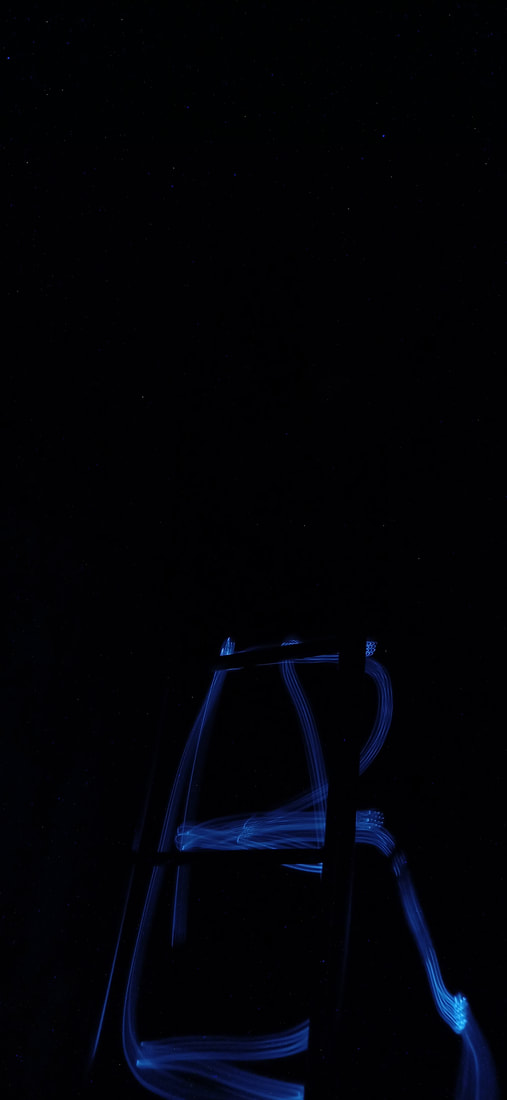
In this photo, I used a head torch to light up a ladder which is hidden in absolute darkness and so gives a mysterious feeling. I like this image especially since it is primarily negative space and allows you to connect the dots, as the ladder is part of the background and allows the light to shine.

I once again used my lego pyramid structure as the basis for this image and I used the endless imagination of Egyptian Mythology to fuel the possible outcome of this photo. As such I have marked a 'Red Sun' one could say at the tip of the pyramid. In this photo you can't see many other things that draw your attention away
|
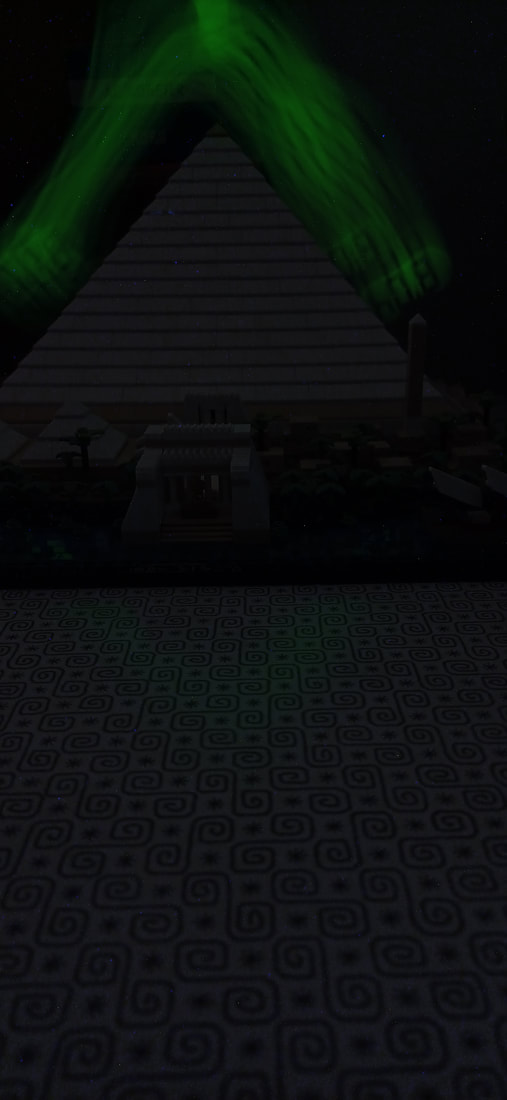
In this image, I used my alarm clock light to create a faint outline around my recently made lego pyramid of Giza, almost mimicking the Aurora Borealis and thus, a calm and cool atmosphere is created. I will note that the appearance of my desk slightly retracts from the overall intended effect of the image.
This photo features the vibrant lights of a flashing head torch to create streaks of light that go in and out through silver wires, one could even be mistaken for them being alight themselves. Once again I think the background doesn't do the image any favours, as unwanted objects can be seen behind the main focus of the lights.
|
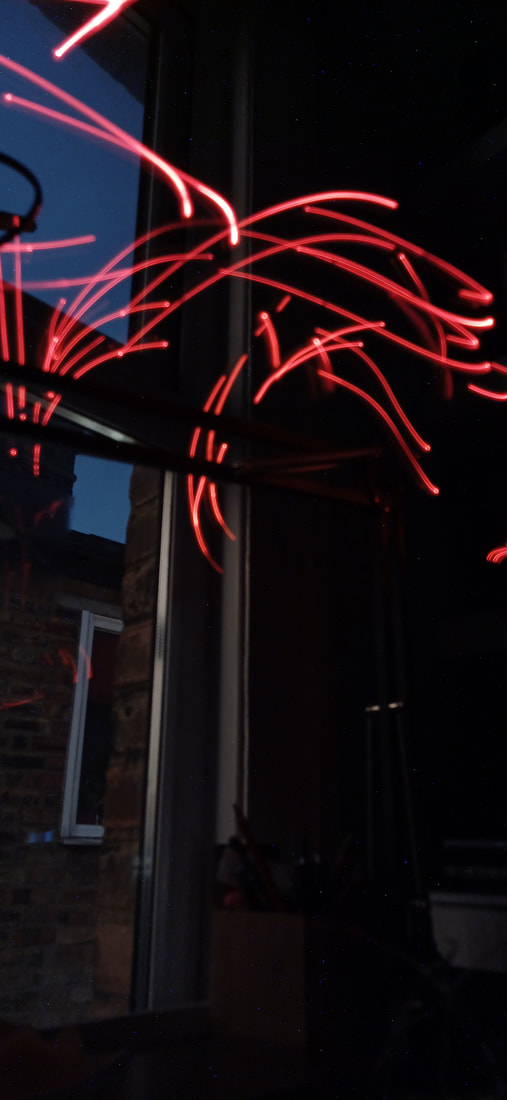
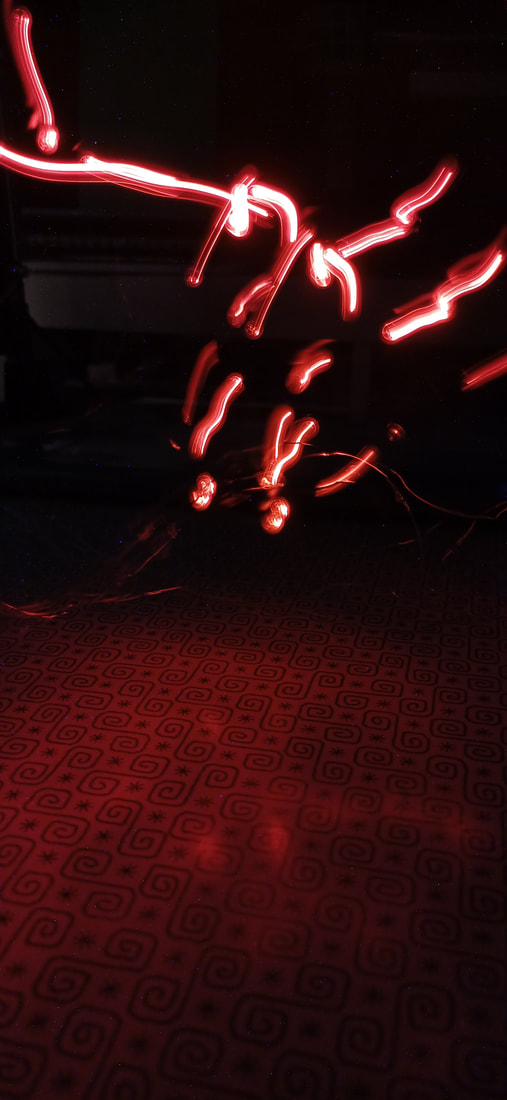
In this photo, I used the red flashes from a light to mark and encircle my lamp. These accents seem to me to look like waves or bars on a musical sheet, just floating in the air. I noticed that my window was exposed in the background but I thought that it didn't hurt the photo too much. This is probably
This photograph doesn't include a sort of frame or material object for which I can base the light around, as I started experimenting without having a set background or physical subject. This image can be seen as slightly inspired by the pathway image that Jacques made.
|
Further Experiments - Independent Learning


All of these photos that I have taken have been shot in the pitch darkness of my room using light sources such as head-torches and the lights off my extension cable. I honestly had no idea what my products would look like, since I had only experimented with light painting to a limited extent in lesson time and I didn't exactly have the same resources
Experimentation in class


At first I was not sure about using the dark room as the location for my composing, since the studio was being used, but it actually turned out to be quite a good setting for my experiments.
There are quite a few errors in my work that come as the result of my amateur photographing skills and the circumstances of the time. One inconsistency is the framing, as on some occasions I have misinterpreted the distance between the subject and the camera and what the image will actually focus on.
There are quite a few errors in my work that come as the result of my amateur photographing skills and the circumstances of the time. One inconsistency is the framing, as on some occasions I have misinterpreted the distance between the subject and the camera and what the image will actually focus on.


During lesson time I began further experimentation with light painting. I was given various resources by the technician such as a increased-quality camera, a torch, LED block and the studio room all to myself. At first I tried to follow Jacques Pugin's preferred environment, which is outside and in the midst of nature. However, after numerous attempts outside it became clear to me that it was just far too bright and exposed, with none of my images coming through. Thus, I simply retreated to the confines of the studio, in which I carried out my experimentation in pitch black.
Many of my photos are flawed in composition and style since I was just experimenting and did it relatively fast so that I did not overstep my time past the lesson. The bottom most image is as faint attempt at trying light painting out in a bright setting, but as you can see it didn't come out very well.
Many of my photos are flawed in composition and style since I was just experimenting and did it relatively fast so that I did not overstep my time past the lesson. The bottom most image is as faint attempt at trying light painting out in a bright setting, but as you can see it didn't come out very well.
|
|

|
